Showing posts with label Dinner. Show all posts

27 July, 2011

Pasta free spinach and ricotta cannelloni

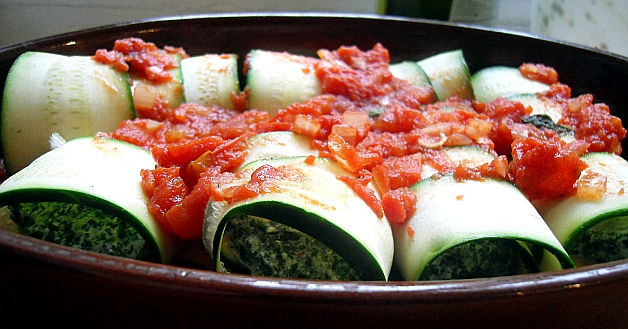
On Monday night, I desperately fancied spinach and ricotta cannelloni, but with my current slimming efforts, having both pasta, ricotta cheese and bechamel sauce in one meal was out of the question. I couldn't quite let the idea go though, and I came to think of how raw foodists use julienned zucchini to replace spaghetti, which inspired me to take the same approach to my cannelloni craving (only with every intention of heating it to above 42 degrees!). It was a bit of an experiment, but it worked really well, and I would definitely make it again. I will never love it as much as I love the real deal, but you know, needs must!

The below recipe is what I made for one, and I had a little left over. I doubt it could have served two though.


Spinach and ricotta zucchini cannelloni:

Serves 1

1 small onion
2 cloves of garlic
1 tin of chopped tomatoes (400 grams)

1 tsp butter
1 tsp plain flour
150 ml milk

1 zucchini
150 grams frozen, chopped spinach, defrosted
100 grams ricotta cheese
Nutmeg
Salt and pepper

First, make your favourite tomato sauce (or crack open the jar, if your favourite comes in one of those). I sautéed a finely chopped onion and a couple of cloves of garlic, poured over a tin of chopped tomatoes, seasoned with salt and pepper, added some fresh basil and left it to simmer while I got on with the rest of it.

Next, prepare a bechamel sauce. Seeing as I was only making enough for myself, I used just a teaspoonful of butter, the same amount of plain flour, and 150 millilitres of milk. Regardless of the quantities you are using, make a roux by melting the butter and stirring in the flour, then add the milk gradually and bring to a boil, stirring constantly until the sauce thickens. Season with salt, pepper and nutmeg.

T0 make the cannelloni, wash the zucchini and trim the ends off. Now cut it into thin slices lengthwise. I found this tricky and actually mauled an entire zucchini trying to make it work (thankfully I had bought two). I tried using a carrot peeler, but it wasn't wide enough. I ended up using my mandoline, which made slices that were far too thick, and then carefully slicing those in half.

In a bowl, mix spinach and ricotta, and season with salt, pepper and nutmeg. Now lay out three or four zucchini slices next to each other on a cutting board, overlapping slightly by about half a centimetre. Place a couple of spoonfuls of the spinach and ricotta filling in a line across all the zucchini slices, close to the end nearest you, and roll up the zucchni slices into a little tube around the filling.

Spread out some of the tomato sauce over the bottom of an oven proof dish. Arrange the zucchini tubes next to each other on top of the tomato sauce, top with the remaining tomato sauce, the bechamel sauce, and perhaps a sprinkling of parmesan cheese. Bake at 200 degrees for about 30 minutes, or until the bechamel sauce is golden and the zucchini tubes are soft.

I had this as is, but had I been less impatient, or maybe serving it to company, a simple salad with rocket leaves and roasted red peppers, and maybe a nice glass of red wine, would have suited this dish well.


14 July, 2011

Macaroni cheese

An American classic, which I have eaten from a tin when I was in England, but which tastes a gazillion times better when it's home made. It's not healthy by anyone's standards, but it's good old fashioned comfort food, perfect for a rainy day, which seems to be all Denmark has to offer at the moment. Using cheddar is textbook, but I prefer a combination of gouda and parmesan. My boyfriend prefers it topped with breadcrumbs, I prefer slices of tomato - so we do both!


Macaroni cheese:

Enough for four people, or maybe two if you're pigging out!

1 large tbsp butter
1 large tbsp plain flour
1/4 tsp cayenne pepper
1/2 tp paprika
500 ml milk
100 grams grated gouda cheese
50 grams grated parmesan cheese
250 grams pasta (I suppose you should use macaroni, but my shop doesn't have it)
Salt and pepper
Bread crumbs or tomato, optional

Heat your oven to 200 degrees. Boil the pasta, preferably for a few minutes less than suggested on the packet.

While the pasta is cooking, make the cheese sauce. First, make a roux by melting the butter and stirring in first the cayenne pepper and paprika, then the flour. Cook for a minute or so, then gradually add the milk while whisking constantly. When all the milk has been added and the sauce has thickened, add the cheeses and season with salt and pepper.

Combine the cheese sauce and cooked pasta in an oven proof dish. For a crunchy topping, top it with a thin layer of bread crumbs and perhaps a few knobs of butter. Alternatively, top it with slices of tomato. Cook in the oven for 20 minutes, or until the sauce is bubbling and your topping is starting to brown.

I had it with a breaded Quorn fillet and roasted asparagus, and you can bet your last Mcnugget it was delicous!

04 July, 2011

Kidney bean patties

These patties are really versatile, and could probably be served in any way you could imagine. As a perfect light summer meal with a filling salad, on a cold autumn day with potatoes, gravy and boiled vegetables, stuff into a pita bread with crunchy vegetables and a dressing - the possibilities are endless! I made them sort of meat ball sized, but if made slightly bigger, they would be great in a veggie burger as well. The taste great cold for lunch the next day too!


Kidney beans patties:

1 tin of kidney beans, drained and rinsed (230 grams drained)
1 egg

1 onion
3-4 tbsp breadcrumbs
2-3 tbsp finely chopped almonds
2 tbsp finely chopped fresh herbs (I used thyme)


Place the kidney beans in a food processor and process until the beans are roughly chopped. Place the chopped beans in a bowl and add the remaining ingredients to make a dough. Leave the dough to rest for about 30 minutes, then shape the dough into patties. I used about a tablespoonful of dough for each patty. 

To bake the patties in the oven, place them on a baking tray lined with baking paper and bake at 200 degrees for 20 minutes, turning after 10.  Alternatively, you could fry them in a bit of oil, in which case they would probably look much prettier and golden than mine did. However, they taste great baked in the oven, and you get 20 minutes to finish whatever you fancy eating with them.


29 June, 2011

Chilli sin carne

Long time, no blog! Today I finished my last exam of the season, and I am now free. Free to sit in the sun, should I so desire. Free to watch tv without feeling quilty. Free to roam the streets of Copenhagen, and free to cook food; glorious, glorious food!

Tonight, I had a scrumptious vegetarian chili, served with a tomato salsa and guacamole. Rice would have been delicious, but alas, I can allow myself no such luxuries! Two months of time consuming exams have led me to buy slightly too many take away pizzas, and as of yesterday, I am officially cutting down on carbs. Now let's see how long it lasts...

The photo is terrible, but a chilli is surprisingly hard to photograph, and I was too hungry to mess about.


Chilli sin carne:

Makes enough for about 4 people.

1 tbsp vegetable oil, I used olive
1 large onion, finely chopped
1 clove of garlic, finely chopped
2 tins of tomato
1 red and 1 green pepper, diced
2 sticks of celery, diced
1 tin of red kidney beans, rinsed and drained
1 tin of borlotti beans (or another type of beans, whichever you prefer)
1 tsp cocoa powder
1 tsp ground cinnamon
1 tsp ground cumin
4 tsp samba oelek
1 bay leaf
Salt and pepper

Sauté the onion and garlic in a bit of oil until soft and translucent. Add the two tins of tomato and about a tin of cold water. Add the diced peppers, celery, beans and spices, and bring to a boil. Season with salt and pepper, and leave to simmer for about 30 minutes, while you prepare whatever you want with it: Rice, bulgur, a salad, tortillas, guacamole, creme fraiche  - anything you like. Remember to fish out the bay leaf before serving :)

22 May, 2011

Grilled halloumi with potato salad

Once upon a time, in a land far, far away, I was barbecuing on a beautiful beach with a fair maiden. Many people had gathered around the barbecue, and there, in the midst of all the beef burgers and sausages, we saw something which neither of us had ever seen before. Our jaws dropped to the floor - what was this magic we saw before our eyes? Could there really be such a thing as a cheese which could lie on a barbecue without melting? Stunned, we sought out the woman who had brought this magical cheese, and that's how we came to know of the wonder that is halloumi.

Since that faithful barbecue, halloumi has become a staple ingredient in my kitchen, often taking the place of the meat I no longer eat. Tonight we had it with another household favourite, potato salad.

Hooray for halloumi, the magical cheese!


Potato salad:

New potatoes (I suppose I used around 500 grams)
4 tbsp fromage frais
1 tsp mayonnaise
1 tsp Dijon mustard
1 bunch of dill
A squeeze of lemon
Salt and pepper

Boil the potatoes until tender and allow to cool down. Mix fromage frais, mayonnaise, mustard and finely chopped dill in a bowl and season with lemon juice, salt and pepper. Cut the potatoes into thick slices and add to the fromage frais dressing.

Halloumi:

Cut a block of halloumi into slices of about 1 centimetre. Fry on a hot griddle pan for a minute or two on each side. Serve asap - the halloumi goes a bit rubbery when it cools down. I served the halloumi and potato salad with grilled asparagus and a freshly baked focaccia.

20 May, 2011

Green bean, potato and tomato salad with a poached egg

If you ever have potatoes and green beans left over from dinner, save them and make this lovely salad for lunch the next day.


 Green bean, potato and tomato salad:

Mixed baby salad leaves
Green beans, cut into bite-sized pieces and boiled for 3.4 minutes
Plum cherry tomatoes, quartered
Potatoes, boiled, peeled and sliced.
Capers
1 egg

Vinaigrette:

Olive oil
Lemon juice
Dijon Mustard
Salt and pepper

Combine salad leaves, green beans and tomatoes in a bowl. Mix a vinaigrette by combining the mustard and lemon, and then slowly adding the oil while stirring constantly. Season the vinaigrette with salt and pepper. Pour the vinaigrette over the vegetables and toss to coat. Arranges the vegetables on a plate, and scatter slices of potato and capers over the top.

To poach the egg, bring water to a boil in a small saucepan. Once it's boiling, reduce the heat so the water is just simmering. Add a few spoonfuls of vinegar to the water. Crack the egg into a small cup, bring the cup close to the surface of the water and gently drop the egg into the simmering water. With a spoon, gently push the egg whites closer to the yoke, to help hold it all together. Let the egg simmer for about 4 minutes. Serve the egg on top of the salad.

15 May, 2011

Falafels with arab-style flat breads

I'm currently stuck in the prison that is exams. All day I spend alone in my bedroom, buried under books and notes, thinking 'til my brain hurts and typing 'til my fingers bleed. And that is exactly why I chose to cook the most time-consuming dinner I could think of! I'm really good at thinking of really important other things I probably should just get done before I can continue working on my exams - suddenly I feel an overwhelming need to wash the floors, clean the oven or bake a cake. Cooking this meal gave me a good two hour break from my studies, and it was fun, too :)

Everyone in this home (all two of us) love falafels, and we'd probably have them much more often if they didn't take so long to cook. Also, they require a little bit of thinking ahead, as you have to soak the chickpeas for about 12 hours or so before you can use them. But if you can find the time, they really are all worth it!


Flat bread (as adapted from the brilliant Danish bread blog, Brødet. Check it out here!):

I get 12 flat breads from this recipe.

350 ml lukewarm water.
25 g fresh yeast
1/2 tsp salt
1/2 tsp sugar
(At least) 500 g flour (I used 100 g spelt flour and 400 g plain flour)

Instructions below


Falafel:

250 g dry chickpeas (Tinned won't work for falafels - I can't make them work, anyway)
A couple of big handfuls of parsley
2 red chillies, no seeds
4 cloves of garlic
1 onion
2 tsp tahini
1 tsp ground coriander
1 tsp ground cumin
2 tsp salt
1 tsp baking powder
4 tbsp plain flour
1 litre sunflower oil for frying

On the night before you want to cook the falafel, place the chickpeas in a bowl and cover with water about twice as high as the chickpeas. Leave to soak in the fridge over night.

To make both flat breads and falafels, start by making the bread dough. Dissolve the yeast in the water and add salt and sugar. Then add the flour, and get your hands in there to mix. Knead for a few minutes, and add more flour if the dough is sticking to your fingers. If it's sticking to your fingers now, it will stick to the pan later! Leave the dough to rise in your warmest room while you prepare the dough for the falafels. I left my dough for about half an hour, and it was fine.

Meanwhile, put your chickpeas into a food processor, and blitz for a few minutes, until they are roughly chopped and resemble a grainy pulp. Spoon the chickpeas into a bowl, and add to the food processor the remaining ingredients, except for the flour and baking powder. Now add about four big spoonfuls of the chopped chickpeas - This will make it easier for the other ingredients to mix. Blitz for a couple of minutes until everything is roughly chopped - you might have to spoon the mixture of the sides a few times to get everything in there. Add this mixture to the bowl of chickpeas, and mix. Now in another bowl, combine the flour and baking powder and mix well. Add it to the chickpeas, and get your fingers in there to make sure everything is mixed well, and that the flour/baking powder mix is evenly distributed. The flour binds the other ingredients together, allowing you to shape the mixture into balls later. Stick the bowl in the fridge while you make your flat breads.

Get your dough, which should have grown substantially in size by now. Remove it from the bowl, knock the air out of it, and cut it into 12 equally sized pieces. Now put a pan on the hob and get it nice and hot, I always just stick it on the highest heat possible. Don't add any butter, oil or anything to the pan. While the pan is getting hot, lightly flour a surface, take a piece of dough and roll it out paper thin. If the dough is sticking to you rolling pin, dust it with flour. You might end up using quite a lot of flour, which is fine. Take your paper thin dough and place it onto the dry, hot pan. Let it cook for about a minute on each side. While it's cooking, roll out your next piece of dough. Continue until all your 12 pieces of dough have turned into yummy flat breads! If you are stacking your flat breads on a plate as they've cooked, a good piece of advice is to keep the most recently cooked one separated from the one underneath it with a piece of baking paper. I find they stick together if they touch while they're very hot.

Back to the falafels! Get the dough from the fridge. Pour your sunflower oil into a sauté pan or just a regular saucepan and place over a high heat. With your hands, start rolling your falafel dough into small balls the size of a walnut. Every once in a while, check to see if the oil is hot enough for frying. You can do that by sticking the wooden end of a match into the oil - when the oil bubbles around the match, it's hot enough to start frying. I normally have time to roll all my falafels before the oil gets hot.

Use a spoon to place the falafels in the hot oil. I only cook four at a time - adding too many will make the oil go cold. Unfortunately, one litre of oil in my sauté pan is just too little for the falafels to be fully emerged, so I have to turn them over once while they fry. I let them cook for a minute or two on each side, until they become golden brown. Remove from the oil, add another four, and keep going until all your falafels are cooked.  While the falafels are cooking, you can chop whichever veggies you want in your flat breads with them. We served them tonight, as they would have been served by our local falafel pusher, with iceberg lettuce, cucumber, tomato, finely sliced red onion a garlic dressing. It was delicious as always, and the best news is that there is plenty left over for lunch today!

13 May, 2011

Creamy Quorn curry

So, I realise that the list of spices used in this recipe seems ridiculously long - I thought so too the first time I made a curry from scratch. However, once you've bought them all, they will keep forever in your cupboard, and making your own curry paste will from then on seem like no effort at all!


Creamy Quorn curry:

For the curry paste:
1 onion
2 fresh red chillis
2 tsp fresh, peeled ginger
2 cloves garlic
1 tsp ground coriander
1 tsp turmeric
1 tsp ground cumin
1/4 tsp nutmeg
1/4 tsp ground cloves
1/4 tsp ground cinamon
4 cardamom pods (using only the little black seeds inside)
About 50 ml vegetable oil

1 bag of frozen Quorn pieces (or I suppose you can use chicken, if you're into that)
1 tin of coconut milk (I used a low fat version)
200 ml of vegetable stock

First, combine all the ingredients for the curry paste in a blender, and blend until smooth. Cook the paste in a large pan over a low heat for about five minutes. Add the coconut milk and stir, then add the frozen Quorn pieces and the stock. Leave to simmer under a lid while you prepare whatever you want to serve with it, or at least until the Quorn pieces are cooked. I served it with fried brown rice with leeks and carrots.

11 May, 2011

Mushroom quiche

This has to be one of my favourite fillings for a quiche. It's really simple, but so delicious, and when it comes to quiches, I do tend to think that less is more. Last time I made it, I used a mix of portobello and oyster mushrooms. If I were a rich man, I would have probably done the same tonight, but it worked really well with just normal white mushrooms as well. 


Mushroom quiche:

1 portion of dough for quiche crust (I used the "just add water" variety)
400 g. button mushrooms
Butter
Dried rosemary
4 organic eggs
2 dl. fromage frais
2 dl. grated gouda
Salt and pepper 

Prepare the dough for your crust, roll it out with a rolling pin or just press it out flat with your fingers until it covers the entire base of your quiche tin. Chop all your mushrooms into small pieces. Fry the mushrooms in butter until all the liquid has evaporated, and season with salt, pepper and rosemary. Divide the mushrooms evenly onto the crust. In a bowl, combine eggs, fromage frais and cheese, and season with salt and pepper. Pour the egg mixture over the mushrooms, and bake the quiche in a preheated oven, for 35 to 40 minutes at 200 degrees (or according to the instructions on whichever quiche crust you are using).

I served it with a salad made with green beans, cherry tomatoes, finely chopped red onion and crumbled feta cheese, with a rapeseed oil, apple cider vinegar, honey and Dijon mustard vinaigrette. 


05 May, 2011

Curried chickpeas

I never felt like a proper vegetarian until I started cooking with the likes of chickpeas, beans and lentils. I used to think that chickpeas were only good for falafel and hummus, for some reason I thought they would be boring and dry when used whole, but now I know how wrong I was. Chickpeas taste great, are low in fat, high in protein and fibre, and what's more, no animals were harmed in their making. What's not to love?


Curried chickpeas:

1 tin of chickpeas in brine (or dried chickpeas, soaked and boiled)
1 onion
1 tablespoon of curry powder
A bit of chilli powder
1 tin of chopped tomatoes
1 tin of coconut milk
2 big handfuls of fresh spinach
Salt and pepper

First, drain the chickpeas and fry in a bit of oil for about five minutes. Season with salt and pepper. Set aside.
Sauté the onion in a bit of oil until soft and translucent. Add curry and chilli, and stop for a second to appreciate the lovely smell spreading into your kitchen. Now add the tomatoes, coconut milk and chickpeas, and season with salt and pepper. Leave to simmer under a lid while you prepare whatever you're having with it - rice, bulgur, couscous, whatever you like! It doesn't need to simmer for very long, but it won't hurt either.
Just before you're ready to serve, add the spinach to the sauce and stir until the spinach has wilted. Done!

02 May, 2011

Tabouleh

Wow, my very own blog - How exciting! It's been a long time under way. First, I spent a long time debating whether to make one at all, 'cos really, who would want to read anything I write? And how would anyone ever come to know of it anyway? But I love to write, so if I want a blog, I'm gonna have one, damn it! Even if it's just for me. Either way, it will be handy having all my recipes readily available online, when I can't think of anything to cook for dinner. Once I had come to the conclusion that I was going to create a blog, the issue of the blog title arose. It's a tricky business, and for a while it seemed like every possible blog title was already in use. But luckily my mind wandered and I ended up thinking, as I so often do, of my favourite zombie-killers Shaun and Ed, and that's how I ended up with my slices of fried gold.


To be honest, I didn't have tabouleh tonight. I had it a few weeks ago, when I was still in the blog-naming process. At that time, Denmark was blessed with wonderful warm weather, and a tabouleh salad with fresh herbs and crunchy veggies seemed the ideal dinner. For a few days now though, it's been pretty chilly, and I've spent a good part of today feeling sorry for myself cold, but the memories of this tabouleh salad reminds me that summer was once here, and that hopefully it will be back again soon.


Tabouleh:


1 dl of coarse bulgur
1 red or yellow pepper (I used yellow)

1 red onion
1 stick of sellery
3 small wine tomatoes
1 carrot
Half a cucumber
2 large handfuls of fresh flat leaf parsley
A large handful of fresh mint
1 tbsp olive oil
1.5 tbsp lemon juice
1 clove garlic
Salt and pepper

While the bulgur is cooling down, finely chop all your vegetables and combine them in a bowl. Finely chop your herbs and add them to the veggies. Once the bulgur has cooled, add it to the vegetables and dress with a dressing made from olive oil, lemon juice, finely chopped garlic and salt and pepper.